A Quick Way to Try Stripe Subscriptions With Docker
Posted on by Gentaro "hibariya" Terada
Stripe provides an easy way to implement subscription services. This document explains how Stripe’s subscription works and the things you can. They also provide an example to implement fixed-price subscriptions, like Netflix. You can try the example repository on GitHub and see the whole lifecycle of a subscription. Actually, you don’t have to even set up any environment for the example app if you have Docker on your computer. The only dependency is Docker.
Prerequisites:
- Docker is installed on your machine.
- You have a Stripe account.
- You have created two products (Basic and Premium) for this example on your Stripe dashboard (instructions).
The Commands
All you have to do on your shell are the following.
# Configure the Stripe CLI
mkdir -p ~/.config/stripe
touch ~/.config/stripe/config.toml
docker run --rm -it \
  --volume ~/.config/stripe/config.toml:/root/.config/stripe/config.toml \
  stripe/stripe-cli login

# Start listening to webhooks from Stripe and forwarding requests on a container
docker run --rm -it \
  --volume ~/.config/stripe/config.toml:/root/.config/stripe/config.toml \
  --name stripe-cli \
  --publish 4242:4242\
  stripe/stripe-cli listen --forward-to http://localhost:4242/stripe-webhook

git clone https://github.com/stripe-samples/subscription-use-cases.git
cd subscription-use-cases

# Set up required environment variables like secret key
cp -p .env.example fixed-price-subscriptions/server/ruby/.env
$EDITOR fixed-price-subscriptions/server/ruby/.env

# Start the example application server on another container
docker run --rm -it \
  --workdir=/work \
  -v $(pwd):/work \
  --network container:stripe-cli \
  ruby:2.7.1 bash -c \
    "cd fixed-price-subscriptions/server/ruby && bundle && bundle exec ruby server.rb -o 0.0.0.0"
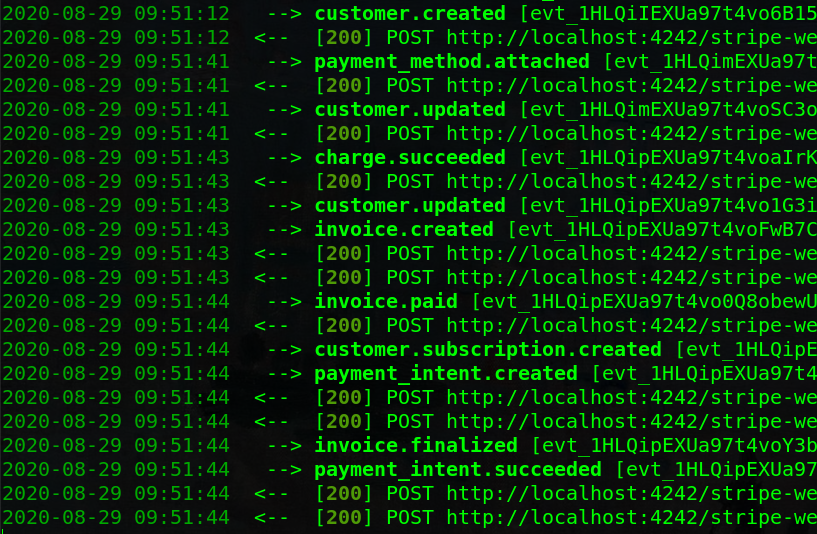
That’s it. This time we try the example with the Ruby implementation. The example Ruby application server will be run on a Docker container. Since we receive webhooks from Stripe in this example, we also need to run the Stripe CLI command on another container. Let me explain the details of each step.
Receive Webhook Requests With Stripe CLI
Since the application will run on our local machine, we have to listen to webhook requests and forward them to the application somehow. This is where the Stripe CLI comes in. Stripe also provides its Docker image.
mkdir -p ~/.config/stripe
touch ~/.config/stripe/config.toml
docker run --rm -it \
  --volume ~/.config/stripe/config.toml:/root/.config/stripe/config.toml \
  stripe/stripe-cli login
Stripe CLI will attempt to open a browser when login but it will fail since we are running it on a container. However, you can open the URL by yourself. Once you succeeded to log in, Stripe CLI will save the authentication information in ~/.config/stripe/config.toml.

Now the Stripe CLI is ready to listen to webhooks.
docker run --rm -it \
  --volume ~/.config/stripe/config.toml:/root/.config/stripe/config.toml \
  --name stripe-cli \
  --publish 4242:4242\
  stripe/stripe-cli listen --forward-to http://localhost:4242/stripe-webhook
This container will forward all webhook requests to http://localhost:4242/stripe-webhook. When we run the application server in the next step, we will use the same network stack as Stripe CLI. That’s why we can use localhost for the forwarding URL. To that end, let’s name the container and publish the TCP port (4242) for that in advance. In this case, we can use the network stack with --network container:stripe-cli option when we invoke another container later.
![]()
Once the container is invoked, you can find a webhook secret that starts with whsec_. We will use it in the next step.
Run the Example Application Server
Let’s clone the example repository from GitHub. We will set up and run a Ruby environment here.
git clone https://github.com/stripe-samples/subscription-use-cases.git
cd subscription-use-cases
We have to set up some environment variables. The server application will load some environments from the .env file using dotenv. Copy the .env.example on the repository root to the server application directory. Then edit it with an editor of your choice.
cp -p .env.example fixed-price-subscriptions/server/ruby/.env
$EDITOR fixed-price-subscriptions/server/ruby/.env
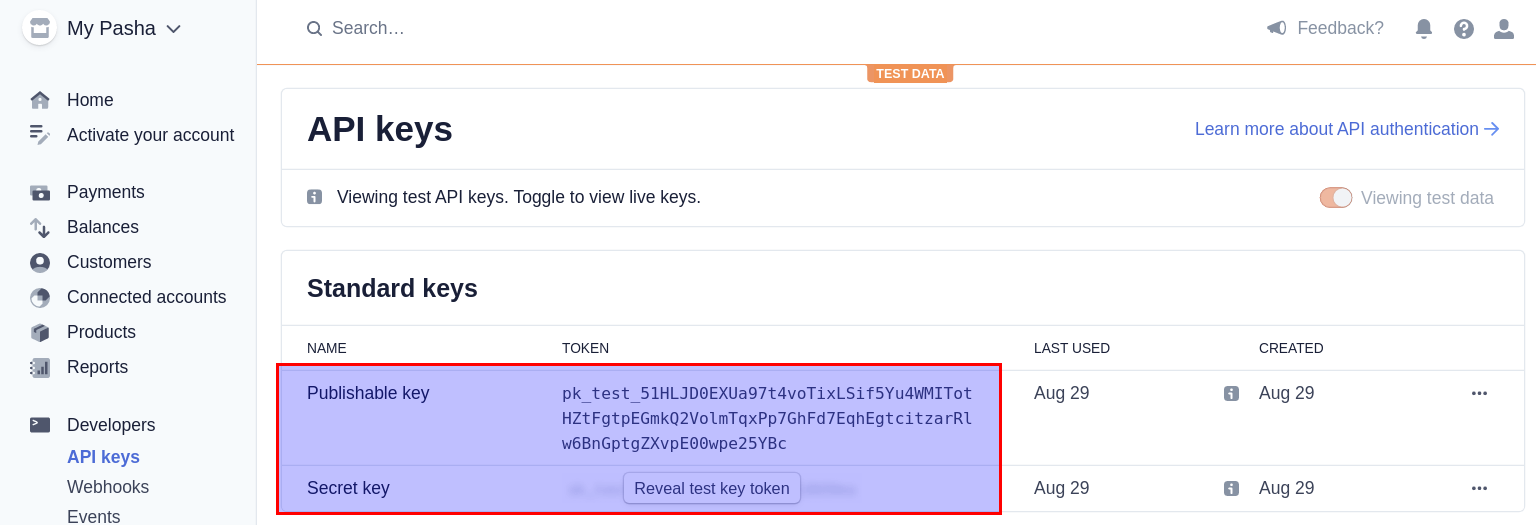
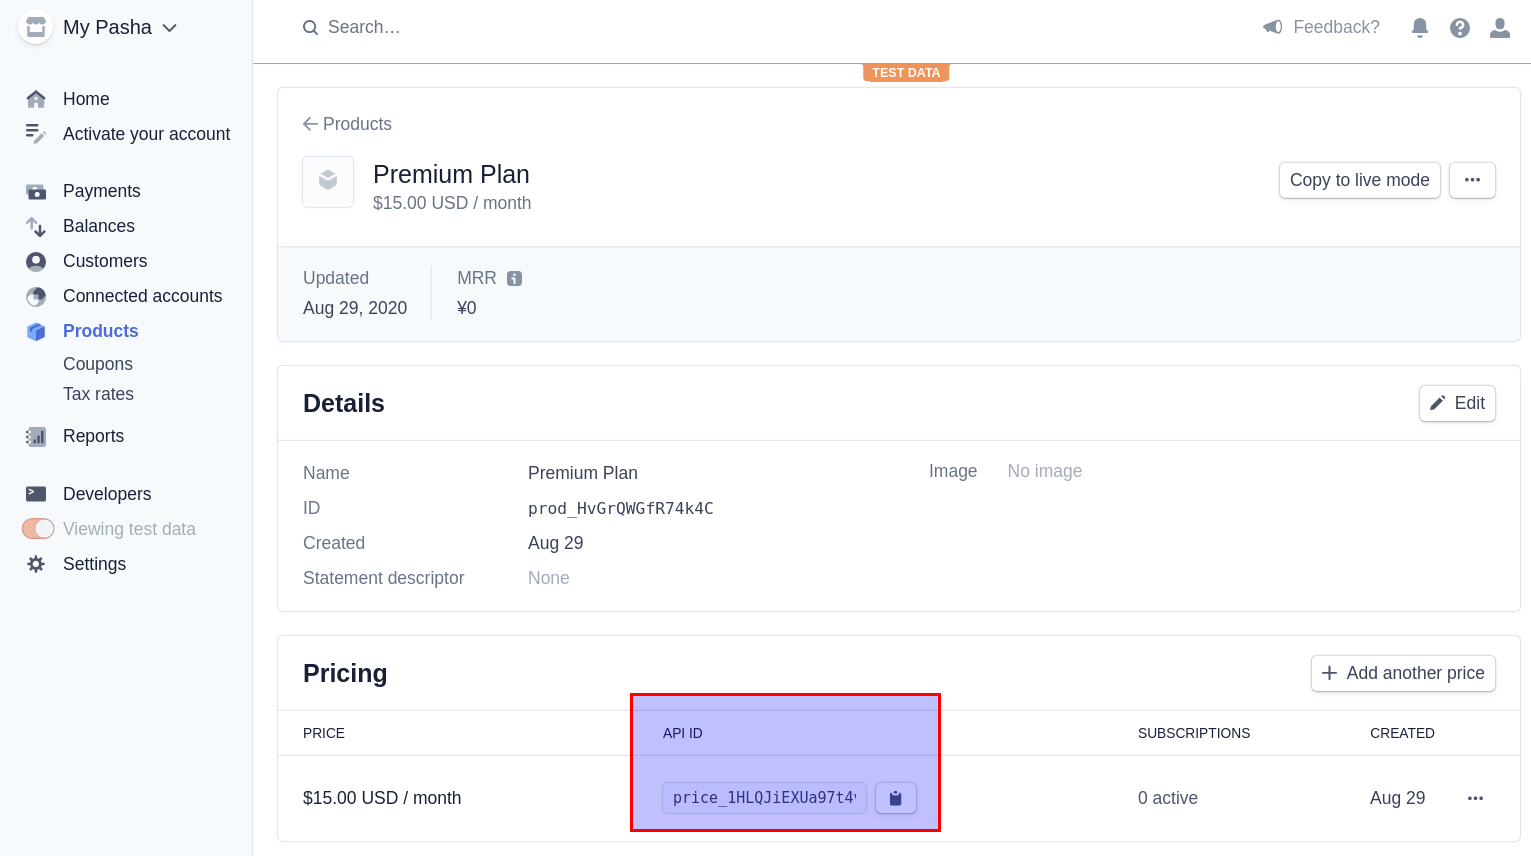
You already got your webhook secret in the previous step. All variables apart from STRIPE_WEBHOOK_SECRET can be found on your Stripe dashboard.
Keys:
Prices:
Finally, install dependencies and run the server on a Docker container. The option --network container:stripe-cli tells Docker to use the same network stack as the stripe-cli container. Since we access to the application from the host machine, the option -o 0.0.0.0 is necessary here. It tells Sinatra to listen to all the network interfaces.
docker run --rm -it \
  --workdir=/work \
  -v $(pwd):/work \
  --network container:stripe-cli \
  ruby:2.7.1 bash -c \
    "cd fixed-price-subscriptions/server/ruby && bundle && bundle exec ruby server.rb -o 0.0.0.0"
Now, you can open localhost:4242 with a browser and play around with subscriptions. The example application demonstrates creating, changing, and cancelling subscriptions. Outputs from Stripe CLI will be useful to figure out what kind of event occurs in a particular action. Enjoy!